
Easy Guide to Fixing Shape Changes in Machine Stitch Designs
Many embroidery users feel upset when a clean design on the screen looks wrong after stitching. A circle may turn into an oval. Small text may close up. Borders may look uneven. These shape changes are common in machine embroidery, even with good tools.The main reason is fabric movement and stitch force during sewing. That is why Understanding Push and Pull Compensation in Embroidery is so important for clean results. When you learn how stitches move fabric, you can fix many common design problems before they happen.
What Shape Changes Mean in Embroidery
Shape change happens when the stitched design looks different from the original file. The design may be smaller, wider, longer, or uneven after sewing.
Common Examples
-
Circle becomes oval
-
Square corners look round
-
Letters close up
-
Borders miss the edge
-
Columns become thin
-
Fill areas shift out of line
These issues happen often with new users.
Why Designs Change Shape
Embroidery uses thread under tension. The needle goes in and out of fabric many times. This action pulls and moves the material.
Main Causes
-
Thread tension
-
Stitch direction
-
Fabric stretch
-
Hoop pressure
-
Wrong stabilizer
-
Dense stitching
-
Fast machine speed
Even small movement can change the final look.
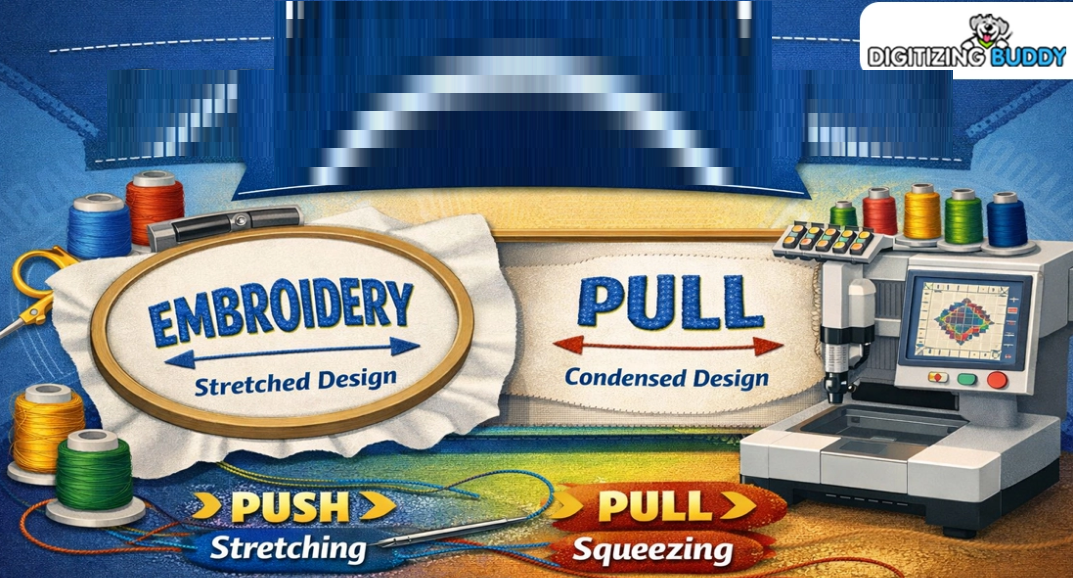
What Push and Pull Mean
These are two common forces in embroidery.
Pull
Stitches can pull fabric inward. This can make wide shapes become narrow.
Push
Stitches can push fabric outward at the ends. This can make shapes grow longer or wider in some spots.
Simple Example
A satin column may get thinner in width but longer at the ends. That is push and pull at work.
Why Compensation Helps
Compensation means changing the file before stitching so the final result looks right after fabric movement.
Smart Changes May Include
-
Making columns wider
-
Extending edges a bit
-
Opening small gaps
-
Adding overlap areas
-
Changing stitch angle
These edits help the sewn design match the planned shape.
Start with the Right Fabric
Fabric choice matters a lot.
Easy Fabrics for Beginners
-
Twill
-
Canvas
-
Denim
-
Firm cotton
These move less during stitching.
Harder Fabrics
-
Stretch knits
-
Thin tees
-
Fleece
-
Soft polos
These need more care and testing.
Use the Best Stabilizer
A good stabilizer supports fabric while stitching.
Cut Away
Best for stretch items and shirts.
Tear Away
Good for firm fabric and light jobs.
Wash Away
Used for lace or special top support.
Tip from Real Use
Many shape issues improve fast when stabilizer is changed to the right type.
Hoop the Fabric Correctly
Bad hooping can stretch or bend fabric before sewing starts.
Good Hooping Tips
-
Keep fabric flat
-
Do not over pull
-
Tighten hoop well
-
Keep grain straight
-
Add backing smooth
If fabric starts wrong, the design may finish wrong.
Check Stitch Density
Too many stitches in one area can force fabric to move.
Signs of High Density
-
Thick hard feel
-
Puckering
-
Needle heat
-
Shape shift
Better Plan
Use balanced density and test on the real fabric.
Watch Stitch Direction
The angle of stitches can change how fabric moves.
Why It Matters
All stitches in one direction may pull one side more.
Smart Fixes
-
Change fill angles
-
Split large fills
-
Use varied stitch paths
This spreads stress across the design.
Fix Satin Columns
Satin columns are common on text and borders.
Problems Seen
-
Thin letters
-
Gaps in borders
-
Uneven width
Helpful Fixes
-
Add width in file
-
Slow machine speed
-
Use right needle
-
Test underlay
Small changes can make big gains.
Fix Small Text Problems
Tiny text is one of the hardest jobs.
Why Text Fails
-
Stitches too close
-
Font too thin
-
Pull closes gaps
Better Results
-
Use bold fonts
-
Increase letter size
-
Add space in letters
-
Reduce extra detail
Readable text beats fancy text.
Fix Circles and Round Shapes
Many users notice circles turn oval.
Why This Happens
Pull force can narrow one side while push adds length.
How to Improve
-
Add slight width
-
Balance stitch angles
-
Use strong backing
-
Test size first
Round shapes need smart planning.
Use Underlay the Right Way
Underlay is the hidden base stitch under top thread.
Benefits
-
Holds fabric in place
-
Lifts top stitches
-
Reduces sink-in
-
Improves edge shape
Good Practice
Use underlay that matches the design type.
Slow the Machine Down
Fast speed can increase movement on some fabrics.
When to Slow Down
-
Stretch fabric
-
Small text
-
Fine detail
-
Metallic thread
-
Dense logos
A slower run can improve control.
Keep Needles Fresh
Old or wrong needles can drag fabric.
Use the Right Needle
Choose size and point for your material.
Change Often
A dull needle can cause skipped stitches and shape issues.
Test Before Full Production
Never trust only the screen image.
Always Run a Sample
Use the same:
-
Fabric
-
Stabilizer
-
Thread
-
Hoop style
Check These Points
-
Size match
-
Clean edges
-
Open text
-
Flat fabric
-
True shape
Testing saves money and time.
Real Experience from the Shop Floor
I have seen many users blame software first. But in real jobs, the issue was often hooping or weak backing. I have also seen users over-edit files when a simple speed change solved the problem.
One common case is left chest logos on polos. Soft knit fabric moves more than firm twill. The same file may sew great on one shirt and poor on another. That is why testing each fabric type matters.
Common Beginner Mistakes
Using One File on All Fabrics
Different materials need different settings.
Ignoring Underlay
Top stitches alone may sink or shift.
Too Much Density
More thread does not always mean better look.
Tight Hooping
Stretching fabric in hoop can distort the result.
No Test Sew
This often leads to waste on final goods.
Smart File Edits That Help
Add Overlap
Place fills under borders so gaps do not show.
Widen Narrow Parts
Thin columns may need extra width.
Open Small Spaces
Inside letters like A, e, o may need more room.
Break Large Areas
Split big fills into parts with angle changes.
Build a Simple Test System
Use one design and test it on many fabrics.
Keep Notes on:
-
Fabric type
-
Stabilizer used
-
Needle size
-
Speed
-
Density
-
Result quality
Soon you will know what works best.
Best Tools for Better Accuracy
Helpful Items
-
Good hoops
-
Quality stabilizer
-
Sharp needles
-
Thread you trust
-
Measuring ruler
-
Test scraps
Simple tools help clean work.
How Experts Think
Strong digitizers know that thread is not ink. It has pull, bulk, and force. They plan for movement before the first stitch starts.
That mindset separates average files from great files.
Quick Fix Checklist
Before your next run, ask:
-
Is fabric right for this file?
-
Is backing strong enough?
-
Is hooping flat?
-
Is density too high?
-
Does text need more space?
-
Should speed be lower?
-
Did I test first?
Final Thoughts
Fixing shape changes in machine stitch designs is not guesswork. It is a mix of fabric choice, file setup, stabilizer use, and smart testing. When you understand how stitches move fabric, you can stop many problems before they start.
Begin with simple designs. Keep notes. Test on real materials. Make small changes one at a time. Over time, your circles stay round, text stays clear, and logos stay sharp. That is how better embroidery results are built every day.
Categorías
Read More
James Brewer - Founder Reps2Beat And AbMax300 Fitness success is often portrayed as a result of extreme effort. Many people believe the path to a stronger body requires longer workouts, heavier weights, and constant intensity. While dedication certainly plays a role in physical development, the reality is that sustainable progress is rarely built on intensity alone. The individuals who achieve...
Buy Naver Accounts In the digital age, where online presence dictates success, having a robust platform to connect with users is essential. For those seeking to tap into the vibrant South Korean market, Buy Naver accounts can be a game-changer. As one of Korea’s leading search engines and social platforms, Naver offers unparalleled access to millions of active users. But what makes it so...

Experience the ultimate in luxury and indulgence with our premium escort services in Courtyard by Marriott. Whether you’re staying at this elegant hotel in Delhi or Gurgaon, we provide sophisticated, high-class companionship tailored to your desires. Our carefully selected escorts are beautiful, charming, and professional, ensuring every moment spent with them is memorable. Courtyard by...

The wellness industry has experienced major changes over the past few years. People are no longer only searching for strict diet programs or difficult fitness routines. Instead, modern consumers are focusing on practical lifestyle improvements that can be maintained consistently over time. This shift toward sustainable healthy living has increased online interest in products like Gelatine...